Taking things apart
I'll quickly go over the parts of the car that need to be taken apart in order to get access to all the wires we need to tap into.
Under the hood, remove all those plastic covers (Fig. 1).
Inside the car, there are a couple of things we need to remove. Some are harder than others. Personally, I think Acura should have given us a harness with everything ready to plug into, but instead they made our lives quite difficult. The first two parts of the dash trim to remove are the panels at the driver's knees (Fig 2 and 3).

(Figure 2) This panel has a philips screw to remove then you just pull towards you and it comes off quite nicely.

(Figure 3) This panel pulls off by first pushing down on the two corners nearest you then pulling it out from under the dash.
Next to remove from the dash is a small panel covering the fuse box assembly (Fig. 4).

(Figure 4) This panel has a little clip at the top right. Pull the rest of the panel out and then pull down to get it away from that clip.
Now comes an "optional" part of the dismantling. In order to enable and disable the factory alarm while arming and disarming your alarm/remote starter, you have to tap into some wires that are only accesible from inside the door panel. This means that you have to do something rather tricky: pass wires through to the door from inside the vehicle. I recommend you do this because if for whatever reason the factory alarm on the car gets armed, you'll have no way of disarming it without having the OEM key fob around. Removing the door panel is very simple. Passing wires from the car into the body of the door is quite difficult. For now, we're just going to remove the door panel which is relatively simple (Fig. 5).

(Figure 5) Unscrew the identified screws, then pull the bottom and sides of the door panel towards you to release the clips. Then lift the top of the panel over the door lock latch. Be careful to remove the wire harnesses before pulling the door panel away from the door completely.
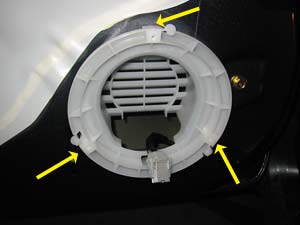
Once the door panel is taken off, you will want to take off the speaker grille in order to get to the main wire connector to fish wires into the door from the main body of the car (Fig. 6).

(Figure 6) First undo the screws holding the speaker itself, unplug the wire harness and set the speaker aside. Then pull on the bracket. The pins (shown) will pull off easily.
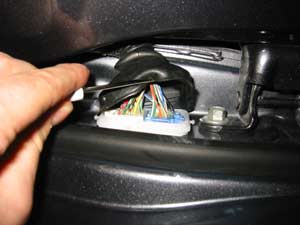
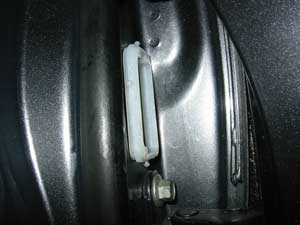
Now you have to take apart the connector inside the door which brings in signals from the car. This is not too difficult but it does take a bit of time. You've got to first remove the rubber sheath at both ends (car and door). Figure 7 shows the sheath on one end. You can now unplug the connector. Now there's a plastic ring (Figure 8) that holds the connector in the door. You have to remove it. It's hard to describe exactly how to do it. You have to pry away the top and bottom and then the connector just falls into the door.
Do the same thing at the car side and you can now fish wires around. The trick is there are empty spots in the connectors. You don't even need to drill them out, wires just pass right through. I passed a total of six wires. Very small wires. I passed wires for:
- Factory arm
- Factory disarm
- Window roll-up
- Window roll-down
- Memory seat selection 1
- Memory seat selection 2
The only essentials are factory arm and disarm, the rest is up to you. So pass wires
Go home


